Krok po kroku z Maja : jak wykonac layout - Step by step with Maja: how to make layout
Witajcie na blogu Lemoncraft, mili fani i goście :-)
Welcome to the Lemoncraft blog, dear Fans and Visitors :-)
Dzisiaj
chcę podzielić się z Wami moją pierwszą pracą z przepięknej nowej
kolekcji Everyday Spring - chociaż nie są to moje ulubione kolory, to
jednak ku mojemu zaskoczeniu papiery od razu chwyciły mnie za serce :-) I
niemal od razu powstał ten słodki, dziewczęcy layout:
Today
I'd like to share my first inspiration using the beautiful new
collection, Everyday Spring - even though these are not my favourite
colours, the papers, to my surprise, stole my heart immediately :-) And
almost immediately this sweet girly page came into being:

A jeśli jesteście ciekawi, zobaczcie, jak powstawał krok po kroku. Wykorzystałam elementy pełnej kolekcji, czyli papiery główne i wersji Basic, kwiaty, tekturki, buttony i pasmanterię, a ponadto również sznureczek woskowany, dziurkacz i kosteczki piankowe, które znajdziecie w ofercie sklepu. Przyda się też kilka narzędzi i gaza ;-)
If
you're interested, here's a step-by-step report on how I made it. I used
elements of the full collection, i.e. the main and Basic papers,
flowers, chipboard pieces, buttons and ribbons, and apart from those
also waxed string, the edge punch and foam dots you can find in the
store too.
Some tools and cheesecloth might also be needed ;-)
Najpierw podkleiłam zdjęcie dwoma warstwami papierów:
First, I matted my photo with two layers of papers:
Z arkusza 04 wycięłam kilka motywów...
I cut out several motives from the 04 sheet...
...z
innych papierów wycięłam dodatkowo bannerki. Wszystkie elementy
potuszowałam i postarzyłam ich brzegi, a na tagu przewiązałam
sznureczek:
... and from other papers I cut out some additional
banners. I inked and distressed all the elements and added string to
the tag:
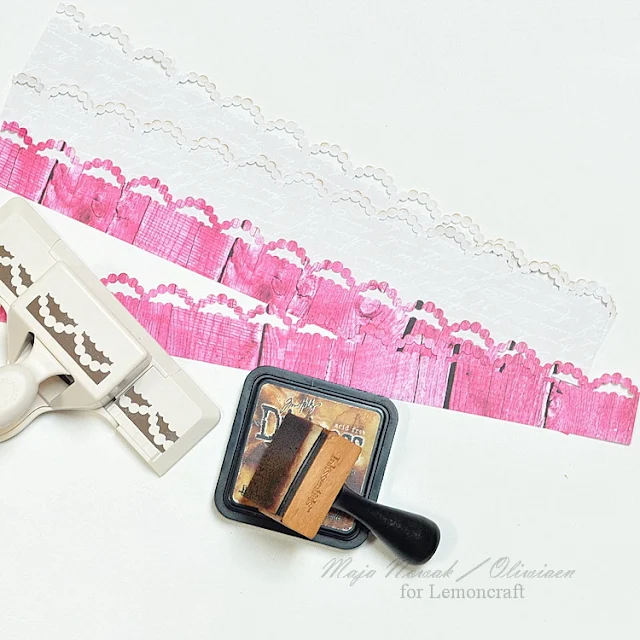
Dziurkaczem
wycięłam brzegi papierów (tu dodatkowo arkusz z zestawu Music Letters) -
ponieważ chciałam je umieścić warstwowo, jaśniejsze paski są szersze.
I
punched the edges of papers (I also used a sheet from the Music Letters
pad) - as I wanted to layer them, the lighter strips are wider.
Z arkusza 06 odcięłam fragment ok. 15 cm szerokości, dokleiłam do niego ozdobne bordery:
I cut a 15 cm piece off the 06 sheet and added the punched borders:
Na tło wykorzystałam mój absolutny faworyt z całej kolekcji - piękny arkusz z zestawu Basic :-)
For the background I used my absolute favourite from the whole collection - the beautiful paper from the Basic pad :-)
I
przyszła pora na rozmieszczenie poszczególnych elementów.
Najpierw
podkleiłam zdjęcie na kosteczkach, ale nie przyklejałam go na razie,
używając go tylko do rozplanowania elementów pod nim:
The time
came for arranging the elements of my page. I mounted the photo on foam
dots, but didn't attach it yet, just used as the reference element for
the motives I wanted to place underneath:
Po
przyklejeniu elementów tła przymocowałam również zdjęcie i dodałam
kolejne elementy: pomponiki, tekturki, button oraz hortensje:
After
glueing the elements of the background I attached the photo as well and
then added further elements: pompoms, chipboard pieces, a button and
hydrangeas:
W dolnym rogu zdjęcia dodałam stokrotki - tu najlepiej sprawdzi się klej na gorąco.
Kompozycję uzupełniłam hortensjami:
In
the bottom left hand corner of the photo I added some daisies - hot
glue gun works best here.
I filled the cluster with hydrangeas:
Do
kompozycji kwiatowej dodałam jeszcze jeden button i kokardki ze
sznureczka.
Po obu stronach zdjęcia umieściłam wycięte motylki:
I added one more button and string bows to the flower cluster.
I also placed butterflies on both sides of the photo:
Na koniec dodałam strzępki gazy pomiędzy kwiatami i warstwami papierów,
by dodać lekkości i wyglądu shabby chic:
Finally I added shreds of cheesecloth between flowers and layers of elements
to add some lightness and shabby look:
I gotowe :-)
And it's finished :-)

Jak widać, nie potrzebujecie skomplikowanych narzędzi, wykrojników
czy mnóstwa dodatków, a stworzenie layoutu wcale nie jest trudne :-)
As you can see, you don't need complicated tools, dies or tons of embellishments, and making a layout is not that difficult :-)
Maja
Materiały/Supplies :
   |


Brak komentarzy:
Prześlij komentarz
Dziękujemy za Twoje słowa