Krok po kroku z Oksaną - Step by step with Oksana
Witajcie, moi kochani!
Hello, dear friends!
Dziś chcę się z Wami podzielić sposobem na wykonanie niestandardowej formy kopertówki.
Today I want to show you how do I make an unusual envelope card..
Wzór koperty.
Jeden z zaznaczonymi centymetrami, drugi do druku.
The template.
The first is with centimeters and the second is for printing.
Tutaj mamy już uzyskaną kopertę po bigowaniu.
Here we have the envelope after bending.
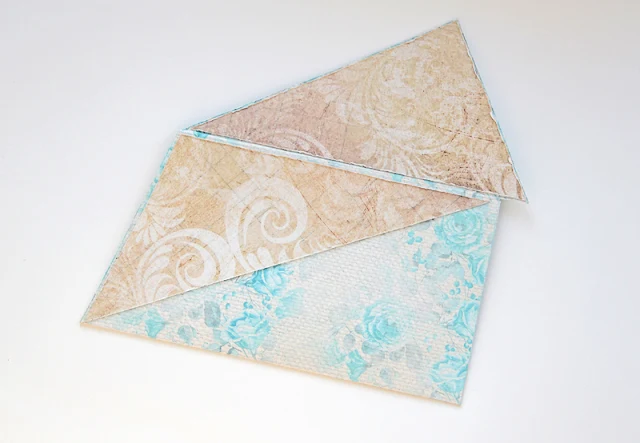
Przygotowujemy części do oklejenia zewnętrznej i wewnętrznej strony koperty. Trójkąty różnią się wielkością o 1,5-2 mm od części bazy.
Now we have to prepare pieces to cover our envelope on the outside and on the inside.
Such triangles aren't in the same size as the basis of the envelope - they are 1.5-2 mm smaller.
Ten kawałek przyklejamy wewnątrz i na górze, dodając 5 mm do ładnego wyeksponowania papieru w innym kolorze.
This piece we tape inside and on the top adding 5mm to display the paper in other color.
Górny trójkąt też wklejałam na papier cofając się od brzegu o 1 mm.
The upper triangle was also glued on the paper moving 1mm from the edge.
Z tyłu dokładamy inny trójkąt
At the back we add another triangle.
Oto rozłożona koperta.
Here is an unfolded envelope.
Wstążkę możecie tylko przykleić i zakryć kawałkiem papieru, ale możecie też przedziurkować klapę, dodać nit i przeciągnąć wstążkę, tak jak ja to zrobiłam. W takim przypadku jak mój, będziecie potrzebować dłuższy kawałek tasiemki.
The ribbon you can just glue and cover it with a piece of paper but you can pull the ribbon through the clinch like I did. In such case you will need a longer piece of ribbon.
Rozpoczynamy ozdabianie koperty. Użyłam nożyczek, kawałka koronki, wstążki.
And now it's time to decorate our envelope. I used scissors, lace and ribbon.
Dodałam też zembossowane na kalce kwiatki.
I also added flowers embossed on a tracing paper.
Dodajemy inne wycięte elementy
We add othe cut elements.
Wycinamy dziewczynkę i przyklejamy ją na beermatę
We cut out the girl and glue it on the back of a beer carton.
Dodajemy do pracy dziewczynkę i zanim klej dobrze wyschnie, wtykamy pod nią motyle i kwiatki.
We put the girl on our composition and quickly stick under her butterflies and flowers, before the glue run dry.
Teraz dekorujemy wierzchnią część klapy. Przyklejamy wycinankę, którą najpierw trzeba odpowiednio przyciąć przy brzegu oraz tekturkę. Na krawędzi możemy dodać uformowane z szyfonu kwiaty lub koronkę.
And now we will decorate the top of our envelope's flap.
We glue a diecut ( firstly cut properly ) and a chipboard. On the edge we can add chiffon flowers or lace.
Dodajemy kolejne elementy - wycięte kwiatki, koronki.
We add other elements - cut flowers, lace.
Zaczynamy tworzyć kwiatową kompozycję.
We begin to make a floral composition.
Dodajemy jeszcze kilka smaczków: tiul, guziki, pręciki.
We add some more elements - tulle, buttons and stamen.
Mam nadzieję, że mój kurs Wam się podoba!
Wszystkiego dobrego!
Pa pa!
I hope you like my tutorial!
All the best to you!
Bye-bye!
Оксана Absurdistika
Materiały/Supplies:
 |  |  |  |  |
 |  |  |
ps. Wiecie już o naszej grupie na Facebooku: Lemoncrafters, stworzonej dla naszych fanów?? Zajrzyjcie, właśnie trwa wyzwanie ekspresowe z super nagrodą!!! :)
ps. Do you know about our Facebook group: Lemoncrafters, created for our fans??
Check it, we have express challenge with great prize!!! :)


This is so gorgeous!! The envelope looks amazing!! Your tutorial is fabulous!! Love this!!
OdpowiedzUsuńSkąd wziąć takie piękne srebrne nożyczki?!
OdpowiedzUsuńA kopertówka obłędnie bogata :D I bardzo fajny kształt :)
Оксана, красота!
OdpowiedzUsuń