Różana zawieszka na butelkę - kurs krok po kroku / A rosy bottle label - a step by step tutorial
Witajcie fani LemonCraft :)
Hello LemonCraft fans :)
Hello LemonCraft fans :)
Lato to świetny moment na tworzenie romantycznych, ukwieconych prac na różne okazje.
Pomocna w tym będzie piękna, starociowa kolekcja papierów "House of Roses Extra".
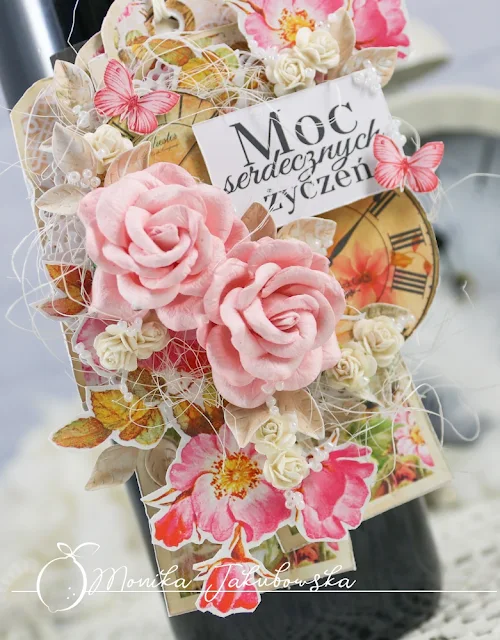
Dziś mam dla Was ozdobną zawieszkę na butelkę, którą zrobiłam właśnie z tych papierów.
Summer is a perfect time to create romantic and floral projects for very different occasions.
Our beautiful vintage collection 'House of Roses Extra' can be very helpful in it.
Today I've got for you a decorative bottle label which I made with this collection.
Summer is a perfect time to create romantic and floral projects for very different occasions.
Our beautiful vintage collection 'House of Roses Extra' can be very helpful in it.
Today I've got for you a decorative bottle label which I made with this collection.
Pokażę Wam jak ją zrobiłam.
I will show you how I made it.
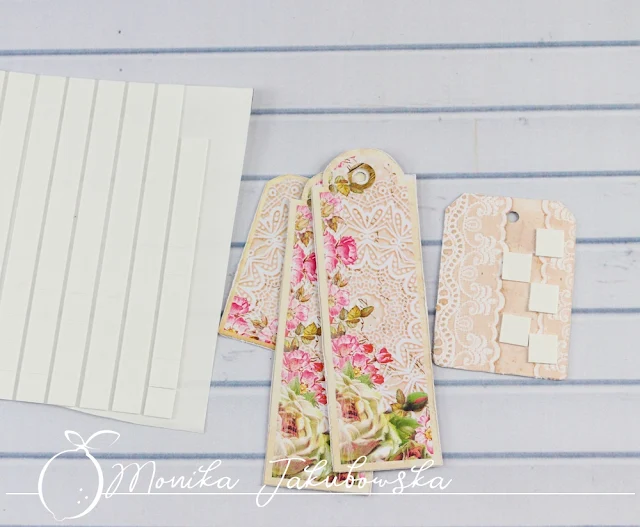
Bazę zawieszki stanowią cztery tagi, które wycięłam z arkuszy House of Roses Extra 04.
Ich brzegi postarzyłam, dziurkaczem wycięłam dziurki.
Z arkusza House of Roses Extra 06 wycięłam dwa zegary oraz dwie gałązki róż.
Its basis are four tags which I cut out of House of Roses Extra 04 sheets.
I made their edges look older and I cut out wholes.
I fussy cut two clocks and two rose branches from the 06 sheet.
Its basis are four tags which I cut out of House of Roses Extra 04 sheets.
I made their edges look older and I cut out wholes.
I fussy cut two clocks and two rose branches from the 06 sheet.
Postarzone tagi skleiłam, podklejając poszczególne warstwy kosteczkami 3D.
Jeden, dłuższy tag umieściłam na środku kompozycji, będzie służył do zawieszenia ozdoby.
I sticked my aged tags together using 3D foam squares.
One of them, a longer one, I put in the middle - I will hang my decor using it.
I sticked my aged tags together using 3D foam squares.
One of them, a longer one, I put in the middle - I will hang my decor using it.
Przez dziurkę środkowego taga przewlokłam sznurek o długości ok. 90cm, do zawieszenia na butelce.
Moja baza była gotowa do ozdabiania.
Ozdabianie rozpoczęłam od przyklejenia serwetek z wykrojników, podklejając je kosteczkami 3D.
I threaded a string ( about 90cm long ) through the whole in the middle tag - I will later hang it on a bottle.
My basis is now ready to be decorated.
I started with taping die doilies with 3D foam squares.
I threaded a string ( about 90cm long ) through the whole in the middle tag - I will later hang it on a bottle.
My basis is now ready to be decorated.
I started with taping die doilies with 3D foam squares.
Na serwetkach ułożyłam sizal, potem górną gałązkę róż, zegary i dolną gałązkę.
Na tym etapie przykleiłam też napis, jeden z najnowszych Freebies.
Poszczególne warstwy podklejałam kosteczkami 3D. Potem przykleiłam duże róże.
Zawsze zaczynam budowę kompozycji kwiatowych od największych elementów, do których dodaję kolejne, mniejsze.
I put istle on the doilies and then the upper rose branch, clocks and lower branch.
At this stage I also taped the inscription - one of our newest Freebies.
I taped every layer with 3D foam squares.
Later I glued big roses.
I always start building my composition with the biggest elements and then I add next, smaller ones.
Z arkusza House of roses extra 08 wycięłam wykrojnikiem listki, uzupełniłam nimi kompozycję.
Na koniec dodałam małe różyczki i koraliki.
I die cut leaves from 08 sheet and I added them to my composition.
At the end I added small roses and beads.
I die cut leaves from 08 sheet and I added them to my composition.
At the end I added small roses and beads.
Tył mojej dekoracji nie wyglądał zbyt efektownie, więc postanowiłam go odrobinę upiększyć, a przy okazji zrobić miejsce na życzenia.
W tym celu wycięłam połączone kółka z dwóch warstw papieru i przykleiłam je na odwrocie ozdoby.
The back side of my decoration didn't look too good so I decided to decorate it a little and by the way to make a place for wishes.
I cut out joined circles of two paper layers and I glued them at the back of my decor.
The back side of my decoration didn't look too good so I decided to decorate it a little and by the way to make a place for wishes.
I cut out joined circles of two paper layers and I glued them at the back of my decor.
Gotowa praca wygląda tak:
The ready project looks like this:
The ready project looks like this:
Materiały/Supplies:


Ze sklepu Hobby Place / From Hobby Place store:


I freebie, który użyłam / And freebie I used:


Ze sklepu Hobby Place / From Hobby Place store:


I freebie, który użyłam / And freebie I used:

Bardzo dziękuję za dzisiejsze spotkanie!
Thank you for today's meeting!
Thank you for today's meeting!


Ciekawa zawieszka z 4 tagów, do tego bardzo bogato ozdobiona. 👍😍
OdpowiedzUsuń